Tableau’s data densification is like…nothing else I’ve ever used. It’s a feature that is totally brilliant when it “just works” like automatically building out a running sum on sparse data and mind-taxingly complicated when a data blend’s results go haywire because densification was accidentally triggered.
What I’ve historically taught users is to always ALWAYS look at the marks count in the status bar as a first way to detect when data densification occurs. Here’s Superstore Sales data with MONTH(Order Date) on Columns, Region and State on Rows, there are 499 marks and we can see that the data is sparse by the class that are missing Abcs:

If I add SUM(Sales) to the Level of Detail Shelf and set it to a Running Total Quick Table Calculation with the default Compute Using of Table (Across) so it’s addressing on Order Date then I see 576 marks and all the Abcs are filled in, this is Tableau’s data densification at work:

However, here are three additional views all still using the same pill layout and Quick Table Calculations showing three different marks counts (567, 528, and 456):


The marks count is changing based on a variety of factors, the different quick table calculations used (running total, difference, and percent difference) are a part of it but the underlying behavior depends on whether a mark is densified or not, the pill arrangement, and whether or not a densified mark has been assigned a value (including Null) or not. Prior to Tableau version 9.0 these all would have been counted in the marks count and the views would show 576 marks for each, Tableau v9.0 changed the behavior to only count the “visible” marks.
I’ll walk through the above there examples. In this one the Running Total has been moved from the Level of Detail to the Rows Shelf and there are 567 marks.

The reason why is that even though those combinations of Region, State, and Month have been densified for states like Iowa that don’t have any sales in the first month(s) of the year (more on how I know that below) those densified marks don’t have any assigned value (even Null) so they are not counted in the marks count nor are they counted in the Special Values indicator in the lower right.
In this view using the Difference calculation there are 528 marks and the Special Values indicator shows 48 nulls (528+48 = 576). In this case the Difference calculation is using the LOOKUP() function that is returning Null for the densified values.

Finally in this view using the % Difference calculation there are 456 marks and the Special Values indicator shows 120 nulls (456+120 = 576). In this case the % difference calculation is spitting out extra nulls due to divide by 0 results.

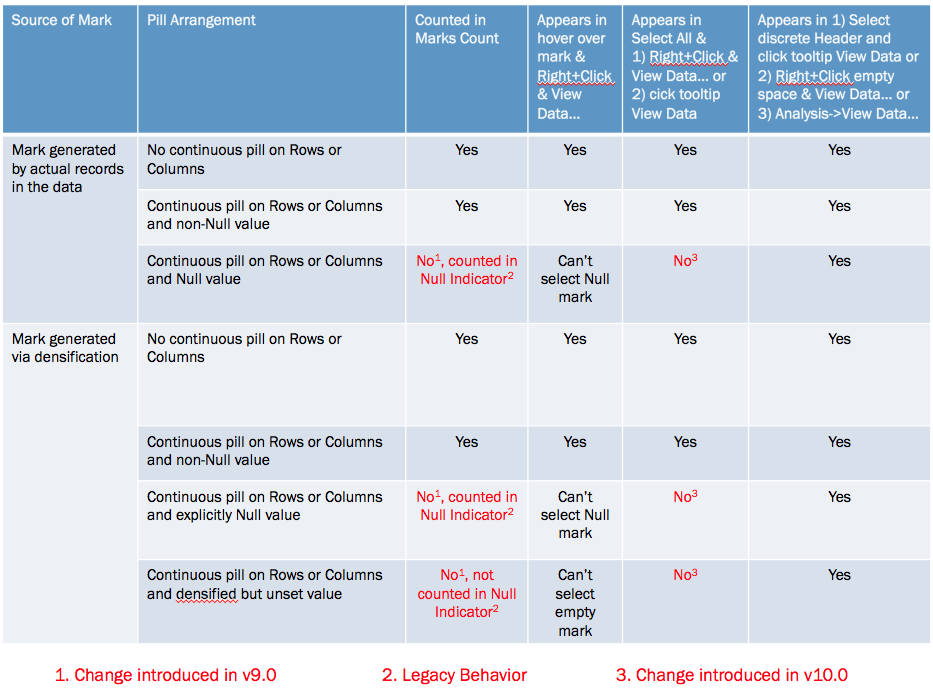
The difference is due to a change made in Tableau v9.0 where the marks count now only counts “visible” marks (Tableau’s term), where the definition of a “visible” mark is complicated, they are the “Yes” answers in the table below:
Now one of the ways I’ve been used to checking for densification is selecting all the marks (either by Right+Clicking and choosing Select All or pressing Ctrl/Cmd+A) and then hovering over a mark and Right+Clicking and choosing View Data… or waiting for the tooltip to come up and using View Data. For example here’s the select all View Data in v9.0 for the % Difference on Rows view, the yellow cells indicate where data was densified and there are 576 rows:

However, that doesn’t work anymore in Tableau v10.0, there was change made to the Select All functionality such that Select All only gets the “visible” marks, here’s that same view data in v10 and there are only 456 rows:

So Select All doesn’t work the way it used to, and the marks count can change in “interesting ways” (and we haven’t gone into what things like formatting Special Values can do), so what can we do to spot densification? There are three workarounds for this, all documented in the right-most column of the table above:
- Select a discrete header or a range of headers, wait for the tooltip to come up, and click on the View Data icon.
- Right-click in the view (but not on a mark) and choose View Data…
- Use the Analyis->View Data… menu option.
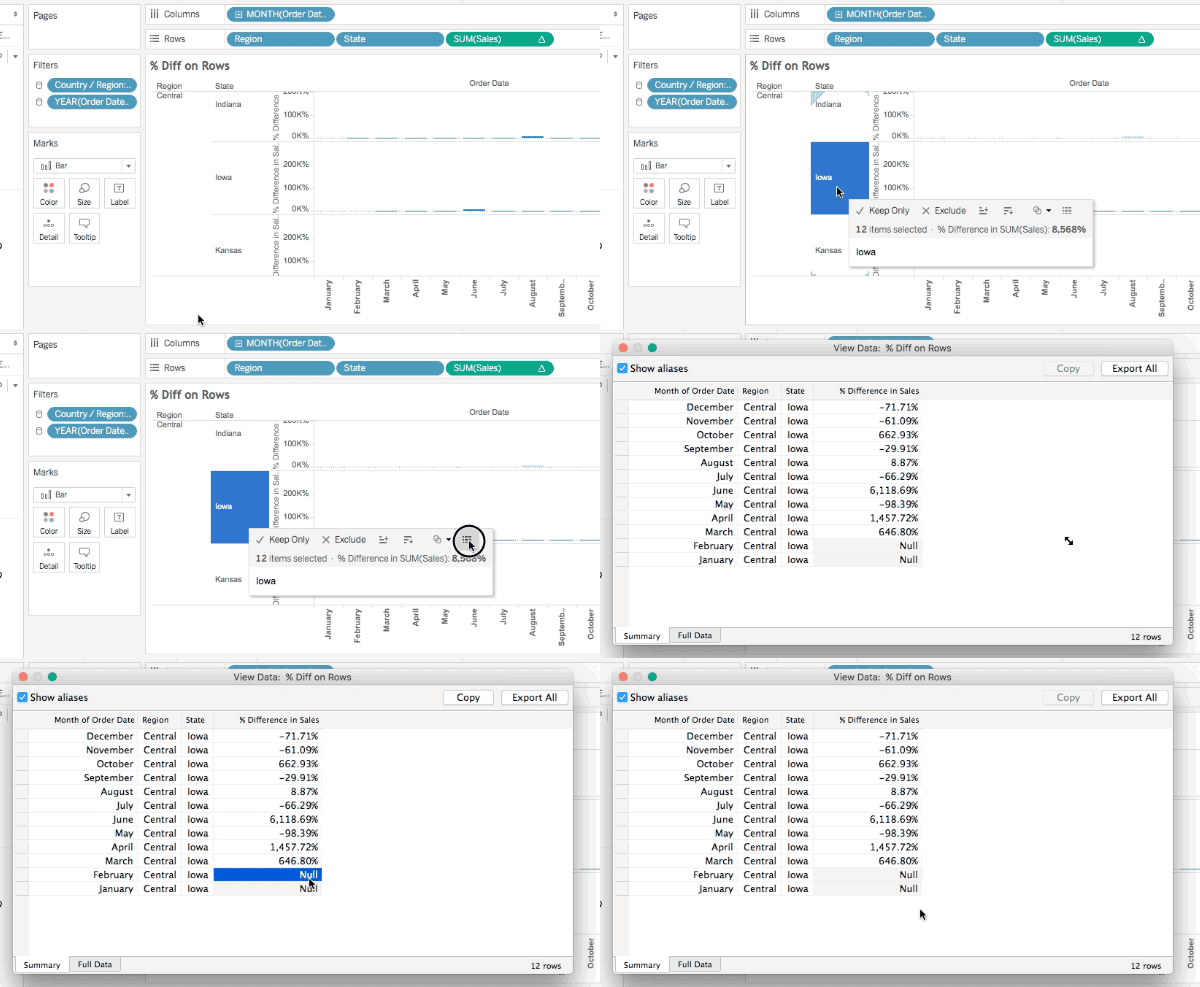
All of these will show the densified values, here’s an animated GIF of selecting Iowa selected in the Difference on Rows view where we can see the two Null values:

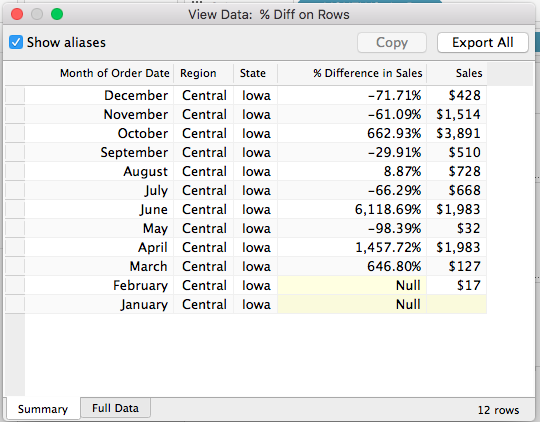
However only one of those is actually densified, to tell that exactly we need to add a field that actually has data. In this case I’ve added SUM(Sales) to the Level of Detail Shelf and the View Data for Iowa now shows that it’s really only January that is densified, since there’s nothing at all in the January SUM(Sales) cell:

Conclusion
The marks count is not a reliable indicator of the volume of densification and we need to resort to various selection mechanisms and the View Data dialog to more specifically identify how much has been densified. I’m not a fan of these changes: what I’d really like Tableau to do is to add a count of densified values to the status bar and details on what was densified to the default caption and the Worksheet->Describe Sheet… Until that time, though, hopefully this post will help you keep track of what Tableau is doing!
Here’s a link to the marks count workbook in v8.3 format (so you can open it up for yourself and see the differences in different versions).


